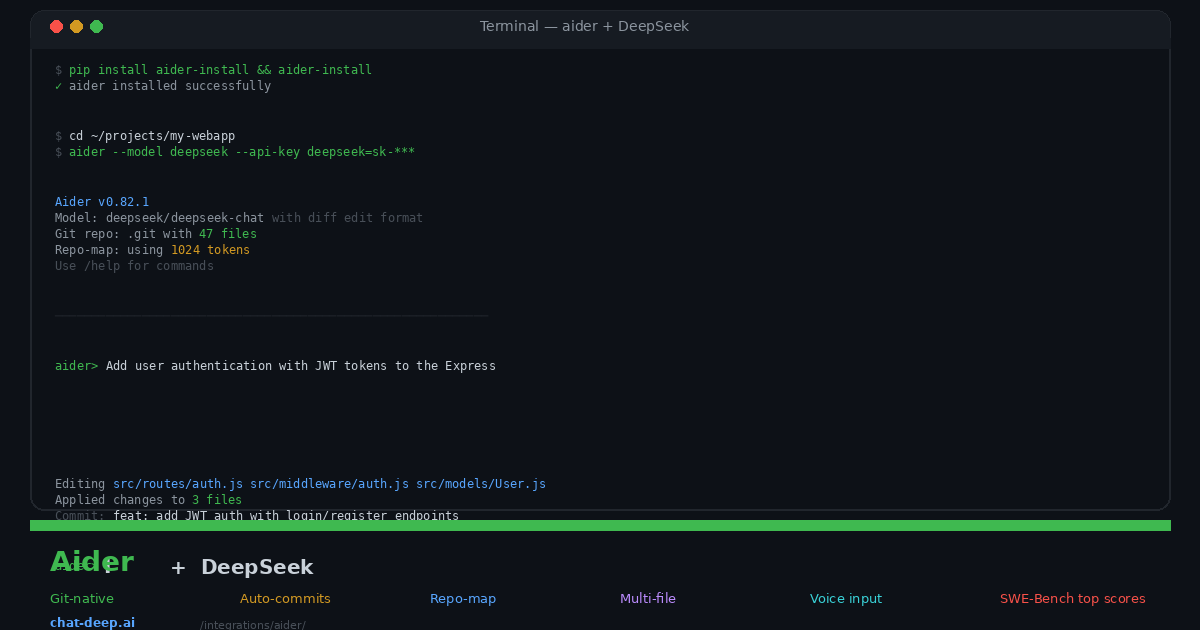
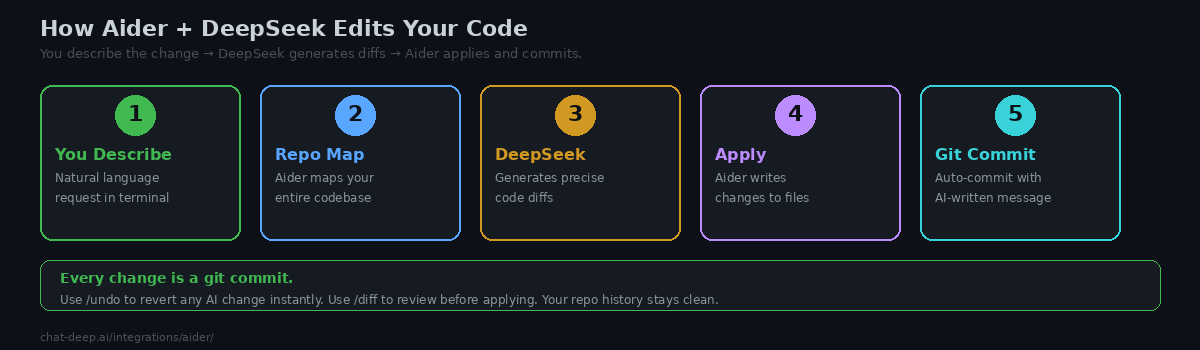
Aider is an open-source AI pair programming tool that lives entirely in your terminal. You describe what you want to change in plain English, and Aider tells DeepSeek to generate the code edits, applies them to your files, and commits the result to git — all in one seamless flow. No browser tabs, no copy-pasting, no manual file editing. You talk, DeepSeek codes, Aider commits.
What separates Aider from other AI coding tools is its deep git integration and its understanding of your entire repository. Before every request, Aider builds a “repo map” — a compact representation of your codebase’s structure, functions, classes, and imports — and sends it to DeepSeek as context. This means DeepSeek does not just see the file you are editing; it understands how that file fits into the larger project. The result is edits that work across file boundaries, respect existing patterns, and avoid breaking dependencies.
DeepSeek is a first-class model in Aider. The deepseek-chat model holds one of the top scores on Aider’s own code editing benchmark, and the shorthand --model deepseek is built into the command. This guide covers installation, DeepSeek configuration, the command workflow, practical examples, and advanced techniques for getting the most out of the pairing. For background on the DeepSeek API, see our API documentation.
Installation
Aider is written in Python but installs in an isolated environment that does not interfere with your existing Python setup:
# Install aider (includes Python 3.12 if needed)
python -m pip install aider-install
aider-install

# Or via uv for faster installation
python -m pip install uv
uv tool install --force --python python3.12 --with pip aider-chat@latest
Verify with aider --version. The current release is in the 0.82.x range as of April 2026. Aider runs on macOS, Linux, and Windows. The installer handles all dependencies, so you do not need to manage a virtual environment.
Connecting DeepSeek
Aider supports DeepSeek as a built-in provider. The simplest way to get started is a single command:
cd /path/to/your/project
aider --model deepseek --api-key deepseek=sk-your-api-key-here
The --model deepseek shorthand automatically selects deepseek/deepseek-chat (DeepSeek V3.2) with the diff edit format, which is the optimal configuration for code editing. The first time you provide your API key, Aider saves it to ~/.aider.conf.yml, so subsequent sessions only need aider --model deepseek.
Alternatively, set the environment variable:
export DEEPSEEK_API_KEY=sk-your-api-key-here
aider --model deepseek
For the reasoning model, use --model deepseek/deepseek-reasoner. This model produces chain-of-thought reasoning before generating code, making it stronger for complex algorithmic problems and debugging. It is slower but more accurate on hard tasks. You can switch models mid-session with the /model command.
Get your API key from the DeepSeek platform — our login guide covers account creation. Check current pricing on our pricing page.
The Aider Workflow
Once Aider launches, it initializes inside your project directory. You see the model name, the number of files in your git repo, and the repo-map token count. From here, the workflow is conversational: you type requests, DeepSeek generates edits, and Aider applies them to your files.
The first thing to understand is the concept of the “chat context.” By default, Aider does not load every file in your project into the prompt — that would exceed token limits for large codebases. Instead, you explicitly add files using the /add command. Aider can read and edit only the files you have added. However, it also creates a repo-map summary of your entire codebase, so DeepSeek understands the project structure even for files that are not directly in the chat.
# Add specific files to the chat context
aider> /add src/routes/auth.js src/models/User.js

# Add an entire directory
aider> /add src/middleware/

# Now describe your change
aider> Add rate limiting middleware that limits each IP to 100 requests
       per 15-minute window. Apply it to all auth routes.
DeepSeek generates the code changes and Aider shows you which files were edited. If the changes look right, they are immediately written to disk and committed to git with an AI-generated commit message. If something went wrong, type /undo to revert the commit and the file changes in one step. This git-native workflow means you never lose work and can always trace what the AI changed.
Essential Commands
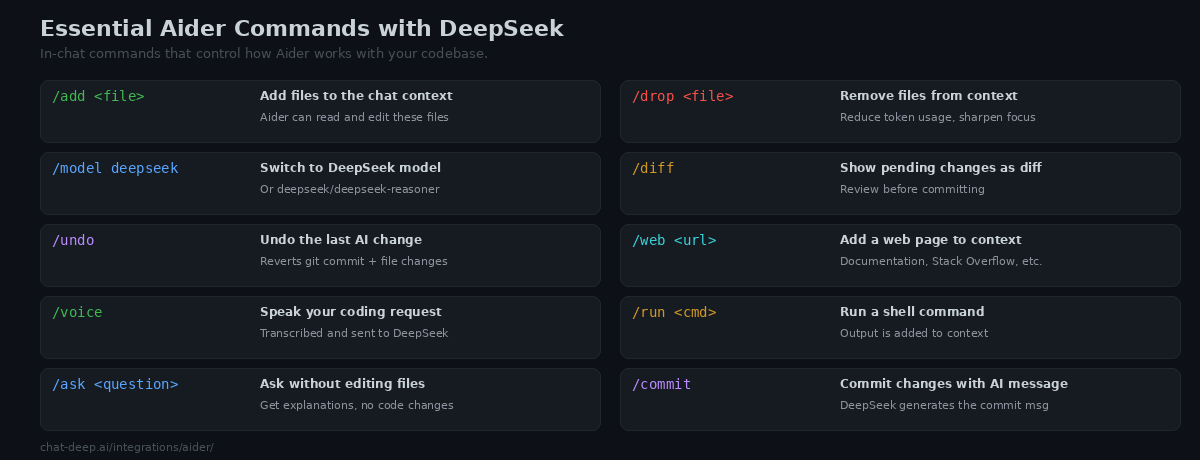
Aider’s in-chat commands start with / and control how it interacts with your codebase and DeepSeek. Here are the ones you will use daily.
/add <file> adds files to the chat. DeepSeek can read and modify these files. Add only the files relevant to your current task — this keeps the context focused and reduces token usage. /drop <file> removes files from the context when you move to a different task.
/ask <question> sends a question to DeepSeek without triggering any code edits. Use it when you want an explanation, a design suggestion, or help understanding existing code. /diff shows the pending changes as a unified diff before they are applied, giving you a chance to review.
/undo reverts the last AI change — both the git commit and the file modifications. This is the safety net that makes Aider’s auto-commit workflow practical. You can undo as many times as you need to roll back a series of changes.
/web <url> fetches a web page and adds its content to the chat. This is invaluable when you are implementing something based on documentation, a Stack Overflow answer, or an API reference. DeepSeek can read the fetched content and use it to inform its code generation.
/voice activates voice input. Speak your coding request, and Aider transcribes it and sends it to DeepSeek. This is surprisingly effective for describing complex changes that are easier to explain verbally than to type.
/run <command> executes a shell command and adds the output to the conversation. After running tests, lint, or a build, DeepSeek can see the errors and fix them. This creates a tight feedback loop: request a change → run tests → let DeepSeek see the failures → request a fix.
/model deepseek/deepseek-reasoner switches to the reasoning model mid-session when you hit a particularly hard problem. Switch back with /model deepseek for normal speed.
Practical Example: Adding Authentication to an Express API
Here is a real-world example of Aider with DeepSeek building a complete feature across multiple files. Starting from a basic Express.js API, we ask Aider to add JWT-based authentication.
$ cd ~/projects/express-api
$ aider --model deepseek

aider> /add src/app.js src/routes/ package.json

aider> Add user authentication with JWT tokens. Create a User model with
       email and bcrypt-hashed password. Add POST /register and POST /login
       endpoints. Create auth middleware that verifies JWT on protected routes.
       Use jsonwebtoken and bcryptjs packages.

# DeepSeek creates:
# - src/models/User.js (Mongoose schema with password hashing)
# - src/routes/auth.js (register + login endpoints)
# - src/middleware/requireAuth.js (JWT verification middleware)
# - Updates src/app.js (imports and route mounting)
# - Updates package.json (adds jsonwebtoken, bcryptjs)

# Commit: feat: add JWT authentication with register/login endpoints
Notice what happened. DeepSeek created three new files and modified two existing ones — all from a single natural language request. Aider’s repo map told DeepSeek about the existing Express app structure, the existing routes pattern, and the Mongoose models already in the project. The generated code follows the same patterns and conventions as the existing codebase because DeepSeek had that context.
Now test it and iterate:
aider> /run npm test

# Test output shows 2 failing tests (missing validation)

aider> Fix the failing tests. The register endpoint should validate
       that email is a valid format and password is at least 8 characters.
       Return 400 with descriptive error messages.

# DeepSeek reads the test output, adds validation, tests pass
# Commit: fix: add input validation to register endpoint
This test-driven loop — make a change, run tests, fix failures — is where Aider excels. The /run command feeds real test output to DeepSeek, which is far more effective than trying to describe errors in words.
Edit Formats
Aider supports multiple edit formats that control how DeepSeek communicates code changes. The default for deepseek-chat is the “diff” format, where DeepSeek generates search-and-replace blocks that Aider applies surgically. This is efficient for small to medium edits because only the changed lines are transmitted.
For larger changes that rewrite entire files, the “whole” format asks DeepSeek to output the complete file. This uses more tokens but avoids issues where a diff might not apply cleanly to a file that has been modified since it was loaded. The “udiff” format generates unified diffs similar to git diff output.
Aider automatically selects the best format based on the model, but you can override it with --edit-format diff or --edit-format whole. For DeepSeek, the diff format provides the best balance of speed and accuracy.
Using Local DeepSeek via Ollama
For complete privacy and zero API costs, connect Aider to a local DeepSeek model running through Ollama:
# Start Ollama with DeepSeek
ollama pull deepseek-r1:14b
ollama serve

# Connect Aider to local model
aider --model ollama/deepseek-r1:14b
The local model is slower than the API but keeps your code entirely on your machine. This is essential for proprietary codebases or air-gapped environments. For better local performance, use the 32B model if your hardware can handle it — our Docker guide covers GPU requirements for each model size.
Using Aider Alongside Your IDE
Aider does not replace your editor — it complements it. A common workflow is to keep Aider running in a terminal panel inside VS Code, Cursor, or any other editor. You browse and read code in the editor, then switch to the Aider terminal to describe changes. Aider modifies the files on disk, your editor detects the changes and refreshes, and you review the results in your normal editing environment.
Another pattern is to add code comments as instructions. Write a comment like // TODO: refactor this to use async/await instead of callbacks, then tell Aider to follow the TODO comments in a given file. DeepSeek reads the comment, understands the intent, and applies the change.
Why DeepSeek Is Ideal for Aider
DeepSeek V3.2 holds one of the top positions on Aider’s coding benchmark. This benchmark tests models on 225 coding exercises across multiple languages, measuring their ability to generate correct, applicable code edits. DeepSeek’s strong showing means it is particularly good at the specific skill Aider needs: understanding existing code structure and producing targeted, accurate edits that apply cleanly.
Cost is the other major factor. Aider workflows are token-intensive — every request includes the repo map, the contents of added files, and the conversation history. With DeepSeek at $0.28/M input tokens and $0.42/M output tokens, a heavy Aider session might cost $0.50-2.00 per day. The same session with GPT-4o would cost 5-10x more. For developers who use Aider as their primary coding tool, this cost difference compounds significantly over weeks and months. For current rates, check our pricing page and for model capabilities, see our models hub.
Configuration File
Aider reads configuration from ~/.aider.conf.yml (global) and .aider.conf.yml in your project root (per-project). Here is a recommended configuration for DeepSeek:
# ~/.aider.conf.yml
model: deepseek/deepseek-chat
auto-commits: true
auto-lint: true
dark-mode: true
pretty: true
stream: true
The auto-lint option runs your project’s linter after each change and automatically fixes any lint errors. Combined with auto-commits, this creates a tight loop where every AI edit is linted, fixed, and committed in one step.
Tips for Effective Pair Programming
Be specific about what you want. “Add authentication” is vague. “Add JWT authentication with bcrypt password hashing, register and login POST endpoints, and middleware that returns 401 for invalid tokens” gives DeepSeek exactly what it needs to generate correct code on the first attempt.
Add only relevant files. The more files in the context, the more tokens consumed and the slower the response. If you are working on the auth module, add the auth files — not the entire src/ directory. Use /drop when you finish a task and move to a different area.
Use the test-driven loop. After each change, run /run npm test (or your project’s test command). If tests fail, DeepSeek sees the error output and can fix the issue in the next prompt. This iterative approach produces better results than asking for a complete feature in one shot.
Use /web for documentation. When implementing against an API or library you are unfamiliar with, run /web https://docs.example.com/api-reference to add the documentation to the context. DeepSeek can then generate code that correctly uses the library’s API.
Review diffs before committing in unfamiliar code. While auto-commit is convenient for routine changes, use aider --no-auto-commits when working on critical sections. This gives you a chance to review the diff with /diff before manually committing.
Check API availability. When DeepSeek’s API experiences high load, responses can be slow or fail. Check our status page for current availability. You can also configure Aider to fall back to a different model — for example, use DeepSeek as primary and OpenRouter as a backup.
Conclusion
Aider turns DeepSeek into a pair programmer that lives in your terminal and thinks in git commits. The repo-map gives DeepSeek structural awareness of your entire project. The git integration means every change is tracked, revertible, and has a meaningful commit message. The /run command creates a test-driven feedback loop that catches errors before they accumulate. And DeepSeek’s benchmark-topping code editing scores mean the generated changes are accurate and apply cleanly.
The workflow is simple: cd into your project, run aider --model deepseek, add the relevant files, and describe what you want. DeepSeek writes the code, Aider applies and commits it, you review and iterate. It is the closest thing to having a senior developer sitting next to you at the terminal — except this one works at 3 AM, never gets frustrated, and costs less than a dollar a day.
For other AI coding tools that pair with DeepSeek, explore our Cursor guide (visual editor with AI), Continue guide (VS Code extension), Cline guide (autonomous coding agent), and Windsurf guide. Browse the full integrations section for more ways to use DeepSeek.