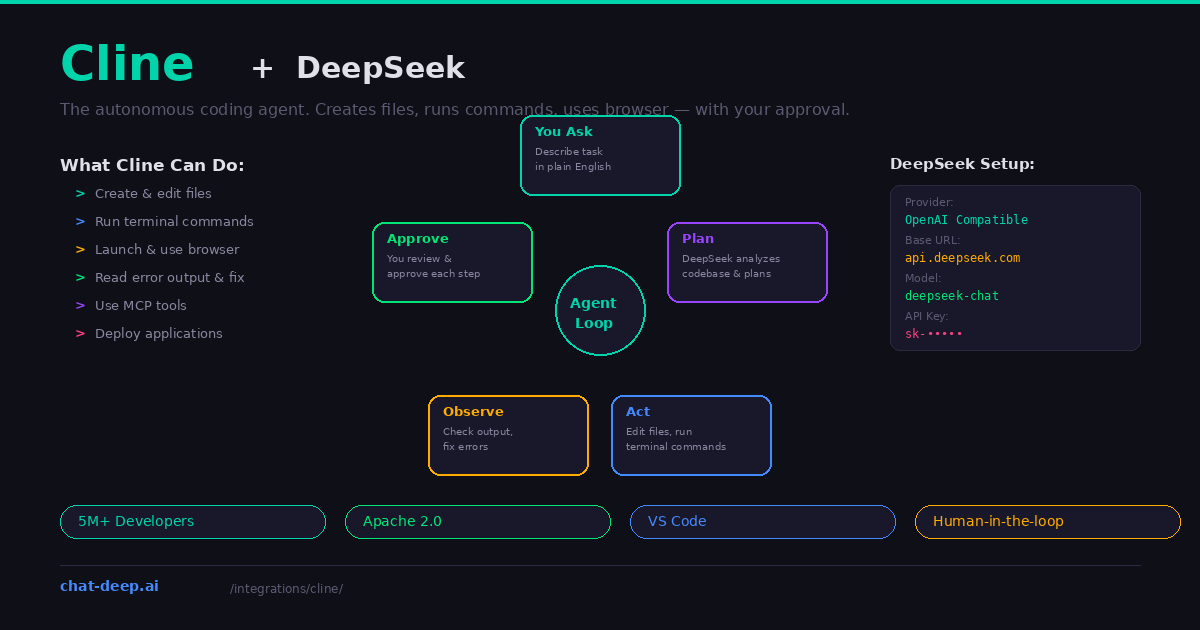
Cline is not another code completion tool. It is an autonomous coding agent that lives inside VS Code. You describe a task — “add user authentication to this Express app” or “fix the failing tests in the payment module” — and Cline analyzes your codebase, creates a plan, writes code across multiple files, runs terminal commands, launches a browser to check the result, and iterates until the task is done. The critical difference from a fully autonomous script: Cline asks your permission before every action.
Formerly known as “Claude Dev,” Cline rebranded to reflect its model-agnostic architecture. It works with Claude, GPT, Gemini, and — most relevant here — DeepSeek. With over 5 million developers and an Apache 2.0 license, Cline has become the most popular open-source AI coding agent for VS Code. Connect it to DeepSeek’s API, and you get autonomous coding capabilities at a fraction of the cost of proprietary alternatives.
This guide covers setting up DeepSeek as Cline’s AI backend, understanding the agent loop, working with the approval workflow, and getting the most out of this combination for real-world development tasks. For API background, see our DeepSeek API documentation.
Installation
Install Cline from the VS Code marketplace. Open Extensions (Ctrl+Shift+X), search for “Cline,” and click Install. The extension adds a Cline icon to the activity bar — click it to open the agent panel on the side of your editor.
Cline works best positioned in the secondary sidebar so you can see both your file explorer and the agent panel simultaneously. Follow the extension’s setup guide to configure this layout. Once installed, Cline prompts you to connect an AI provider.
Connecting DeepSeek
Open Cline’s settings panel. Select “OpenAI Compatible” as the API provider. Configure three fields:
Base URL: https://api.deepseek.com
API Key: Your DeepSeek API key (starts with sk-). Get it from platform.deepseek.com. Our login guide covers account creation.
Model ID: deepseek-chat for the general-purpose model or deepseek-reasoner for the chain-of-thought reasoning model.
Click “Done.” Cline connects to DeepSeek and you are ready to start giving it tasks. You can also connect via OpenRouter if you want access to multiple models through a single API key — set the base URL to https://openrouter.ai/api/v1 and the model ID to deepseek/deepseek-chat.
How the Agent Loop Works
Cline operates in a continuous loop that mirrors how a careful developer approaches a task. Understanding this loop is key to working effectively with the agent.
Step 1: You describe the task. Type a natural language description of what you want. Be specific — “Add a /users endpoint that returns paginated results with filtering by role and status, including TypeScript types and Jest tests” gives Cline much more to work with than “add a users endpoint.”
Step 2: Cline plans. Before writing any code, Cline analyzes your project. It reads the file structure, examines source code ASTs (abstract syntax trees), runs regex searches across the codebase, and reads relevant files to understand the existing patterns, dependencies, and conventions. DeepSeek receives all this context and generates a plan for implementing the task.
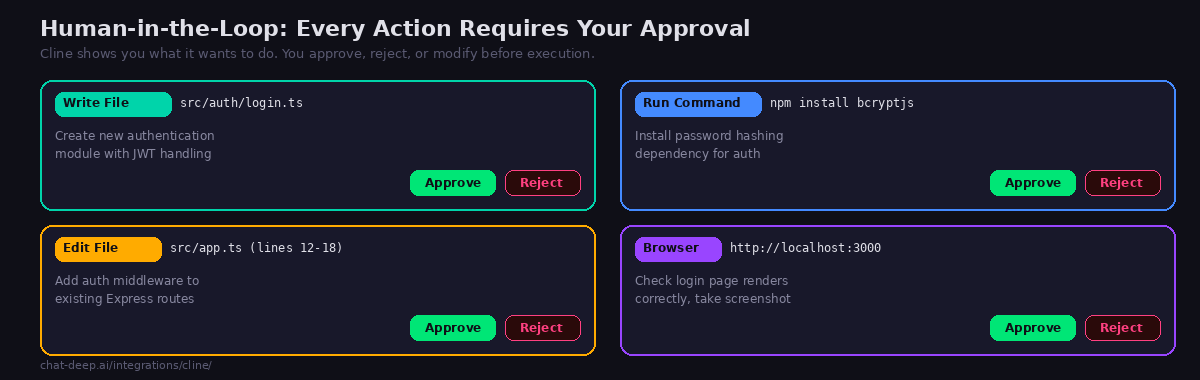
Step 3: Cline acts. Based on the plan, Cline proposes specific actions — creating a file, editing an existing file, or running a terminal command. Each action is presented to you with a clear description of what it will do and why.
Step 4: You approve. This is the human-in-the-loop checkpoint. Cline shows you the exact file contents it wants to write, the exact command it wants to run, or the exact edit it wants to make. You click “Approve” to proceed or “Reject” to stop. You can also modify the request with additional instructions.
Step 5: Cline observes. After executing an action, Cline monitors the results. If a terminal command produces an error, Cline reads the error output and adjusts its plan. If a linter catches a syntax issue in a newly created file, Cline fixes it. This observe-and-correct cycle continues until the task is complete or you stop it.
The entire loop repeats — plan, act, approve, observe — until the task is done. Cline then presents the final result and suggests a next step, such as running the application or opening a browser to verify the changes.
What Cline Can Do
Cline’s capabilities go far beyond code generation. Here is what the agent can do with your approval at each step.
Create and edit files. Cline writes new files and modifies existing ones. It monitors linter and compiler errors as it works and proactively fixes issues like missing imports and syntax errors without you having to point them out. When editing existing files, it shows a clear diff of the proposed changes.
Execute terminal commands. Cline runs shell commands directly in your VS Code terminal — installing packages, running builds, executing tests, starting dev servers, deploying applications. It reads the terminal output and reacts to it. If npm test shows 3 failing tests, Cline reads the failure messages and starts fixing them.
Use the browser. For web development tasks, Cline launches a headless browser, navigates to your local dev server, clicks buttons, fills forms, scrolls pages, and takes screenshots. It reads console logs to catch runtime errors. If a CSS layout looks broken in the screenshot, Cline can fix the styling. This visual feedback loop is unique to Cline — no other VS Code extension offers it.
Use MCP tools. Cline supports the Model Context Protocol, which means it can connect to external services through MCP servers — databases, APIs, cloud services, and custom tools. DeepSeek decides which MCP tools to call based on the task, making Cline extensible beyond its built-in capabilities.
Choosing Between deepseek-chat and deepseek-reasoner
For most Cline tasks, deepseek-chat is the better choice. It responds quickly, supports function calling (which Cline uses for tool selection), and handles the majority of coding tasks well. The agent loop involves many back-and-forth interactions, and fast response times keep the workflow fluid.
The deepseek-reasoner model produces chain-of-thought reasoning before generating code, which is valuable for genuinely hard problems — complex algorithms, architectural decisions, debugging subtle race conditions. However, it is significantly slower (10-30 seconds per response versus 2-5 seconds for the chat model), and this latency compounds across the multiple interactions in an agent loop. Use the reasoner when you encounter a specific hard problem within a larger task, but stick with the chat model as your default. For model details, see our DeepSeek V3 page.
Running with Local DeepSeek
For complete privacy, connect Cline to a local DeepSeek instance through Ollama or LM Studio. In Cline’s settings, select “Ollama” as the provider or use “LM Studio” and point to your local endpoint. The model runs on your hardware and no code is sent to external servers.
The trade-off is speed and quality. Local models (7B, 14B, or 32B distills) are less capable than the full DeepSeek V3.2 available through the API. For complex multi-step tasks that require Cline to iterate through several plan-act-observe cycles, the API model produces better results. For simpler tasks or when privacy is non-negotiable, local models work well. See our Docker guide for GPU requirements per model size.
Cost Tracking
Cline tracks token usage and estimated API cost for every task. The sidebar shows the total tokens consumed and the running cost as the agent works. This is important because autonomous agent tasks can be token-intensive — a complex feature implementation might involve 10-20 DeepSeek interactions, each with substantial context.
With DeepSeek’s pricing at $0.28/M input tokens and $0.42/M output tokens, a typical Cline task costs $0.05-0.30 depending on complexity. A full day of heavy Cline usage might run $2-5 — far less than comparable tasks with Claude Sonnet or GPT-4o, which can cost $10-40/day for agent workflows. Check our pricing page for current rates.
Practical Example: Building a REST API Endpoint
Here is what a real Cline task looks like with DeepSeek. Starting from an existing Express.js project, you type in the Cline panel:
“Add a GET /api/products endpoint that returns paginated products from the MongoDB database. Include filtering by category and price range. Add the Mongoose model if it doesn’t exist. Write Jest tests for the endpoint.”
Cline’s response unfolds as a series of approval requests. First, it asks to read your existing route files and package.json to understand the project structure — Approve. Then it proposes creating src/models/Product.js with a Mongoose schema — Approve. It creates src/routes/products.js with the paginated endpoint, filtering logic, and input validation — Approve. It edits src/app.js to mount the new route — Approve. It runs npm install mongoose if not already installed — Approve. It creates tests/products.test.js with test cases — Approve. Finally, it runs npm test to verify everything passes.
If a test fails, Cline reads the failure output, identifies the issue, proposes a fix, and asks you to approve the fix. This cycle continues until all tests pass. The entire process takes 3-5 minutes with DeepSeek’s API, including your review time at each step. The total cost for a task like this is typically $0.10-0.20 in DeepSeek tokens.
Plan and Act Modes
Cline supports two operational modes. In Plan mode, the agent analyzes your codebase and generates a detailed implementation plan — but does not execute any actions. This is useful when you want to review the approach before committing to it. You can modify the plan, add constraints, or ask Cline to consider alternative approaches before switching to Act mode.
In Act mode, Cline executes the plan step by step with approval prompts at each action. This is the default mode for most tasks. You can toggle between modes during a session — start in Plan mode to review the approach, then switch to Act mode to execute it. For complex tasks, the plan-then-act workflow prevents the agent from going down the wrong path and wasting tokens on an approach you would have rejected.
Cline vs. Other AI Coding Tools
Cline occupies a unique position in the AI coding landscape. Unlike Continue (which focuses on chat, autocomplete, and inline editing), Cline is a full autonomous agent — it does not just suggest code, it executes actions. Unlike Cursor (which is a standalone editor), Cline runs inside your existing VS Code setup with all your extensions, settings, and keybindings intact.
Compared to Aider (terminal-based pair programming), Cline offers browser integration and a visual approval workflow inside VS Code. Aider’s strength is git-native commits and repo-mapping; Cline’s strength is autonomous execution with visual feedback. Many developers use both — Aider for terminal-first refactoring and Cline for complex tasks that benefit from browser testing and visual approval.
Cline’s closest comparison is Cursor’s Agent Mode, which also executes actions autonomously. The key difference: Cline is a free extension you add to VS Code, while Cursor Agent Mode requires the $20/month Cursor Pro plan inside a proprietary editor. If you want agent capabilities without switching editors or paying a subscription, Cline with DeepSeek is the most cost-effective path.
Tips for Effective Agent Usage
Be specific in your initial prompt. The quality of Cline’s plan depends entirely on how well you describe the task. Include the desired behavior, the files involved, the technologies to use, and any constraints. A detailed prompt saves multiple agent iterations and reduces cost.
Add images for visual tasks. Cline accepts images in the chat. Drop a screenshot of a design mockup and ask Cline to implement it. DeepSeek analyzes the image and generates the HTML/CSS/React code to match. This is one of the fastest paths from design to working code.
Use the browser integration for frontend work. When Cline builds or modifies a frontend feature, let it launch the browser and verify the result visually. It catches CSS issues, broken layouts, and runtime errors that you would otherwise find manually. The screenshot feedback loop dramatically reduces back-and-forth.
Review carefully before approving destructive actions. File creations and small edits are low-risk — you can always undo. Terminal commands like rm -rf, database migrations, or deployment commands deserve careful review. Cline always shows you the exact command before running it, so read it before clicking Approve.
Monitor costs. Agent tasks consume more tokens than simple chat interactions. The cost tracker in the sidebar keeps you informed. If a task is taking too many iterations without progress, stop it and provide more specific instructions rather than letting the agent burn tokens trying different approaches.
Check API health. Autonomous agents are sensitive to API latency and availability. If DeepSeek is experiencing slow responses, the agent loop becomes frustratingly sluggish. Check our status page before starting complex tasks.
Conclusion
Cline transforms DeepSeek from a chat API into an autonomous developer that works inside your editor. It reads your code, makes a plan, writes files, runs commands, checks results in a browser, and iterates — all with your explicit approval at every step. The human-in-the-loop design gives you the productivity benefits of autonomous AI without the risks of unsupervised code execution.
DeepSeek’s cost advantage makes Cline practical for daily use. Where agent workflows with premium models can run $10-40/day, the same tasks with DeepSeek cost $2-5. That difference compounds over weeks and months into significant savings for individual developers and teams alike.
Install Cline, connect DeepSeek, and describe your first task. Watch the agent analyze your project, propose a plan, and start executing — always waiting for your approval before each step. For complementary tools, see our Cursor guide for a dedicated AI editor, Aider guide for terminal-based pair programming, Continue guide for a lighter-weight Copilot replacement, and browse the full integrations section for more ways to use DeepSeek.