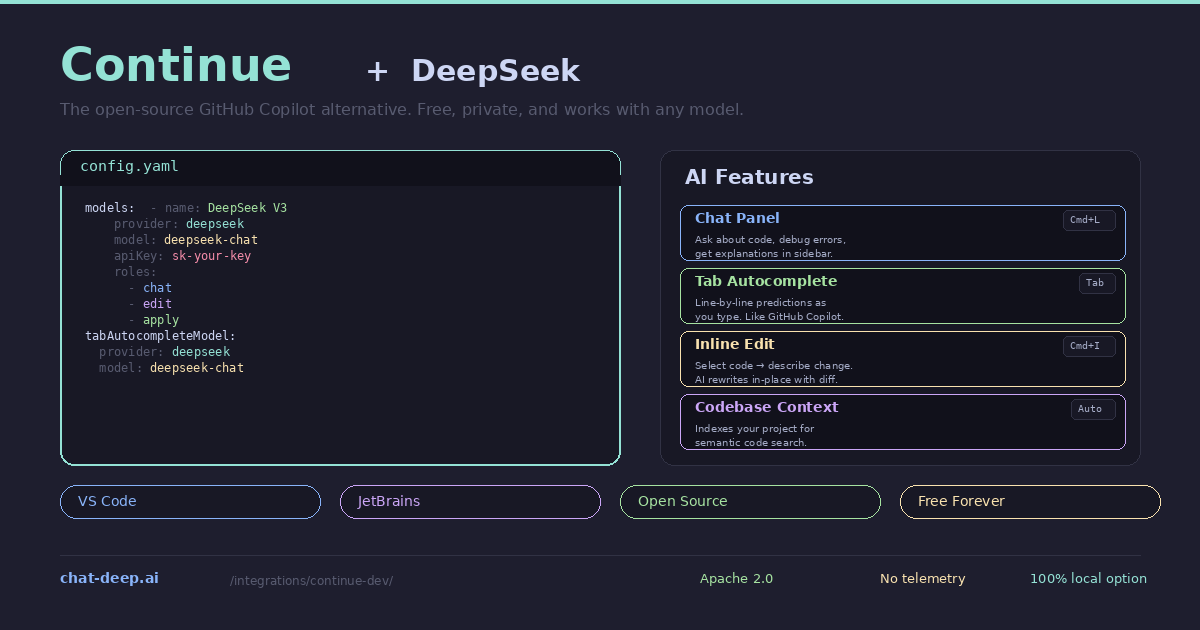
Continue is the leading open-source AI coding extension for VS Code and JetBrains IDEs. It gives you the same core features as GitHub Copilot — tab autocomplete, inline chat, code editing, and codebase-aware context — but with two crucial differences: it is completely free, and you choose which AI model powers it. Pair Continue with DeepSeek and you get an AI coding assistant that rivals Copilot in quality, costs a fraction of the price, and keeps your code private if you choose to run the model locally.
Continue has a native DeepSeek provider built in. You do not need to use the generic OpenAI provider or configure compatibility endpoints — just set provider: deepseek in the config and you are connected. The extension supports both deepseek-chat for fast coding assistance and deepseek-reasoner for chain-of-thought reasoning on hard problems. You can even assign different models to different roles — one for chat, another for autocomplete, a third for code editing — all configured in a single YAML file.
This guide covers installation, DeepSeek configuration for both API and local usage, each AI feature, multi-model setups, and tips for maximizing productivity. For background on the DeepSeek API, see our API documentation. For model details, visit our models hub.
Installation
Continue runs as an extension inside your existing editor. Install it from the marketplace — no separate application to download.
VS Code: Open the Extensions panel (Ctrl+Shift+X), search for “Continue”, and install it. The extension adds a Continue icon to the activity bar and enables tab autocomplete.
JetBrains: Go to Settings → Plugins → Marketplace, search for “Continue”, and install. Supported in IntelliJ IDEA, PyCharm, WebStorm, GoLand, PhpStorm, and all other JetBrains IDEs.
After installation, Continue prompts you to configure a model provider. This is where DeepSeek comes in.
Configuring DeepSeek
Continue uses a YAML configuration file that controls which models are available and how they are used. Open it with the command palette: press Cmd+Shift+P (Mac) or Ctrl+Shift+P (Windows/Linux), type “Continue: Open config.yaml”, and press Enter.
Add DeepSeek as a model provider:
name: My Coding Assistant
version: 1.0.0
schema: v1

models:
  - name: DeepSeek V3
    provider: deepseek
    model: deepseek-chat
    apiKey: sk-your-deepseek-api-key
    roles:
      - chat
      - edit
      - apply

tabAutocompleteModel:
  provider: deepseek
  model: deepseek-chat
  apiKey: sk-your-deepseek-api-key
Save the file and Continue connects to DeepSeek immediately. The roles field defines where this model is used — chat for the sidebar conversation, edit for inline code modifications, and apply for applying suggested changes. The separate tabAutocompleteModel section configures the model used for real-time tab completions as you type.
Get your API key from the DeepSeek platform — our login guide covers account creation. For pricing, check our DeepSeek pricing page.
Using DeepSeek in Continue’s Features
Chat Panel (Cmd+L). The sidebar chat is where you have conversations with DeepSeek about your code. Highlight a function and press Cmd+L to add it to the chat context, then ask DeepSeek to explain it, optimize it, or find bugs. Continue automatically includes relevant context from your open files and the codebase index, so DeepSeek understands the broader project structure. You can also type @filename in the chat to explicitly reference a file.
Tab Autocomplete. As you type, DeepSeek predicts the next lines and shows them as ghost text. Press Tab to accept. This is the feature that most directly replaces GitHub Copilot. Continue sends the current file content and cursor position to DeepSeek’s completion endpoint, and DeepSeek returns contextually appropriate code. The predictions are fast enough for real-time use — typically under 500ms with the hosted API.
Inline Edit (Cmd+I). Select a block of code, press Cmd+I, and describe the change you want. DeepSeek generates the edited version and Continue shows a diff overlay. Accept or reject the change with a single keypress. This is the fastest way to refactor small sections — rename variables, add error handling, convert a callback to async/await, or add TypeScript types to a JavaScript function.
Codebase Context. Continue indexes your project for semantic search. When you ask a question in chat, Continue retrieves relevant code snippets from across your codebase and includes them in the DeepSeek prompt. This means DeepSeek can answer questions about your project even if the relevant code is in a file you have not opened. The codebase indexer runs in the background and updates as you edit files.
Adding the Reasoning Model
For difficult problems that benefit from step-by-step reasoning — complex debugging, algorithm design, architectural decisions — add deepseek-reasoner as a second model:
models:
  - name: DeepSeek V3
    provider: deepseek
    model: deepseek-chat
    apiKey: sk-your-key
    roles:
      - chat
      - edit
      - apply

  - name: DeepSeek R1 (Reasoning)
    provider: deepseek
    model: deepseek-reasoner
    apiKey: sk-your-key
    roles:
      - chat
Both models appear in the model picker at the bottom of the chat panel. Use DeepSeek V3 for everyday coding and switch to R1 when you encounter something that requires deeper analysis. The reasoner model produces chain-of-thought output before answering, so responses take longer but are more thorough on hard problems. For a detailed comparison, see our DeepSeek V3 page.
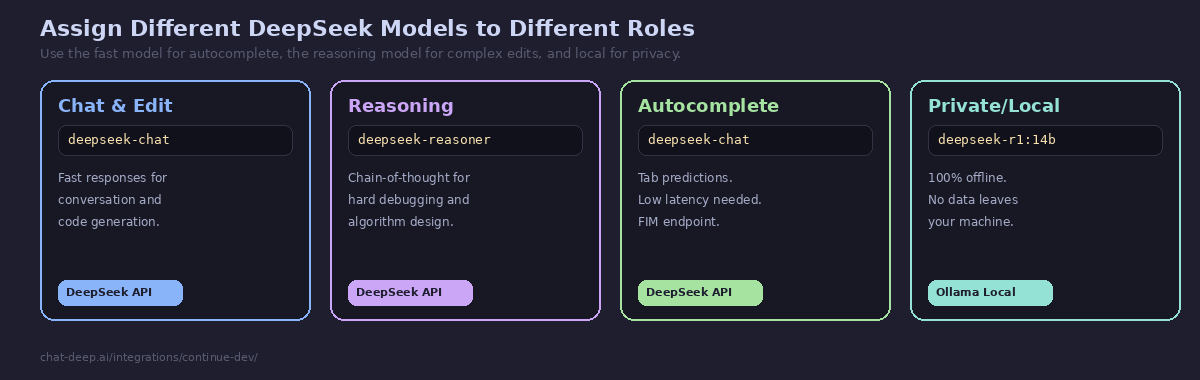
Running 100% Locally with Ollama
Continue’s strongest differentiator from GitHub Copilot is the ability to run entirely locally. Connect Continue to Ollama and your code never leaves your machine — no API calls, no cloud dependency, no telemetry.
# Pull a DeepSeek model locally
ollama pull deepseek-r1:14b

# Configure Continue to use it
models:
  - name: DeepSeek R1 Local
    provider: ollama
    model: deepseek-r1:14b
    roles:
      - chat
      - edit
      - apply

tabAutocompleteModel:
  provider: ollama
  model: deepseek-r1:14b
If Continue runs inside a Docker container while Ollama runs on the host, use http://host.docker.internal:11434 as the base URL. For native VS Code, Continue auto-discovers Ollama at localhost:11434 without additional configuration.
The local setup is ideal for developers working with proprietary codebases, companies with strict data residency requirements, or anyone who wants AI coding assistance without ongoing API costs. The trade-off is speed — local models are slower than the hosted API, especially for autocomplete where latency matters. The 14B model on a modern GPU provides a reasonable balance between quality and responsiveness. For GPU requirements by model size, see our Docker guide.
Context Providers
Continue enriches every DeepSeek request with context from your development environment. The config file controls which context providers are active:
context:
  - provider: code        # Current file and selection
  - provider: docs        # Documentation from URLs
  - provider: diff        # Uncommitted git changes
  - provider: terminal    # Recent terminal output
  - provider: problems    # VS Code problems panel
  - provider: folder      # Files in a directory
  - provider: codebase    # Semantic search across project
The diff provider is particularly useful — it includes your uncommitted git changes in the context, so DeepSeek can see what you have been working on and provide relevant suggestions. The terminal provider feeds recent terminal output (build errors, test results) into the conversation. The problems provider includes VS Code’s diagnostics, so DeepSeek can see linting errors and type issues without you having to describe them.
Together, these context providers give DeepSeek a comprehensive view of your current development state — the code, the changes, the errors, and the documentation — without you manually copying anything into the chat.
FIM Completion for Smarter Autocomplete
DeepSeek supports Fill-in-the-Middle (FIM) completion, which is specifically designed for code autocomplete. Instead of simply predicting the next tokens after the cursor, FIM sends the code before and after the cursor position to DeepSeek, and the model generates the code that belongs in the middle. This produces more contextually accurate completions because DeepSeek can see what comes after the insertion point — not just what came before it.
Continue uses FIM automatically when connected to DeepSeek for tab autocomplete. The model receives the prefix (code above the cursor) and suffix (code below the cursor) as separate context fields, and generates the completion that bridges them. This is why DeepSeek’s autocomplete in Continue often feels more precise than standard left-to-right prediction — it understands the full context surrounding the cursor position.
Troubleshooting Common Issues
If Continue shows a 404 error when connecting to DeepSeek, your extension version may be using a legacy completions endpoint. Add useLegacyCompletionsEndpoint: false to the model configuration in your config file. Alternatively, update Continue to the latest version, which includes the native DeepSeek provider that handles this automatically.
If autocomplete feels slow or unresponsive, check your internet connection to the DeepSeek API. Tab autocomplete is latency-sensitive — anything over 1 second feels sluggish. If the API is experiencing high load (check our status page), consider switching autocomplete to a local model via Ollama while keeping chat on the API.
If you see an error about the provider not being recognized when using provider: "deepseek", your Continue version predates the native DeepSeek provider. Either update the extension, or use the OpenAI-compatible fallback by setting provider: "openai" with apiBase: "https://api.deepseek.com". Both approaches produce the same results — the native provider is simply cleaner configuration.
If the codebase context does not seem to include relevant files, the indexer may not have finished its initial scan. Check the Continue output panel (View → Output → Continue) for indexing progress. Large projects can take several minutes to index on first launch. Once indexed, updates happen incrementally as you edit files.
Continue vs. GitHub Copilot
The comparison is straightforward. GitHub Copilot costs $10-19/month, uses a fixed set of models you cannot change, sends your code to GitHub’s servers, and locks you into their ecosystem. Continue is free, supports any model (including DeepSeek, Claude, GPT, Gemini, and local models via Ollama), runs on VS Code and JetBrains, and is fully open source under the Apache 2.0 license.
When you pair Continue with DeepSeek’s API, the cost comparison is even more dramatic. A heavy day of coding with DeepSeek through Continue costs roughly $0.10-0.50 in API tokens. Over a month, that is $3-15 compared to Copilot’s fixed $10-19 — and you get to choose your model, switch providers at will, and run locally when needed.
Copilot’s advantage is polish and zero configuration — it works out of the box with no setup. Continue requires editing a config file and providing your own API key. For developers comfortable with that level of configuration, Continue with DeepSeek is the better deal. For a comparison with other AI editors, see our Cursor guide and Windsurf guide.
Tips for Best Results
Disable other AI extensions. If you have GitHub Copilot or another AI coding extension installed, disable it before using Continue. Multiple AI extensions competing for the same autocomplete and inline edit triggers create conflicts and unpredictable behavior.
Use @-mentions for precise context. In the chat panel, type @ to see available context commands. @file adds a specific file, @folder adds an entire directory, @docs references indexed documentation, and @codebase runs a semantic search across your project. Precise context produces better DeepSeek responses.
Configure separate autocomplete and chat models. Tab autocomplete needs speed above all else — a 200ms response feels instant, while 2 seconds feels broken. If your local model is slow, use the DeepSeek API for autocomplete (fast cloud inference) while keeping a local model for chat and edit (where a few seconds of latency is acceptable).
Add documentation to context. Use the docs context provider to index API documentation, framework guides, or internal wikis. When you ask DeepSeek to implement something, it can reference the actual documentation instead of relying on training data that might be outdated.
Check API availability. If DeepSeek responses slow down or fail, check our status page for current API health. You can configure multiple model providers as fallbacks — for example, DeepSeek as primary and a local Ollama model as backup.
Conclusion
Continue turns DeepSeek into a full GitHub Copilot replacement that costs less, respects your privacy, and works in both VS Code and JetBrains. The native DeepSeek provider makes setup effortless — a few lines of YAML and you have tab autocomplete, chat, inline editing, and codebase-aware context working together seamlessly. The multi-model architecture lets you assign different DeepSeek models to different tasks, and the Ollama integration gives you a fully local, completely private coding assistant when you need it.
For teams evaluating alternatives to GitHub Copilot, Continue with DeepSeek offers a compelling combination: open-source transparency (you can audit every line of the extension code), model flexibility (switch providers without changing your workflow), and cost efficiency (DeepSeek’s API is 90%+ cheaper than Copilot’s fixed subscription for equivalent or better coding quality). The FIM completion, context providers, and multi-model support make it a serious tool for professional development, not just a toy for experimentation.
Start by installing the extension, adding your DeepSeek API key to config.yaml, and coding as you normally would. The tab completions appear automatically, the chat panel is a Cmd+L away, and inline editing is a Cmd+I away. For other AI coding tools that pair with DeepSeek, explore our Cursor guide (dedicated AI editor), Aider guide (terminal pair programming), Cline guide (autonomous coding agent), and browse the full integrations section for all the ways to use DeepSeek across your development stack.