Next.js is the most popular React framework for production web apps. Its App Router gives you server-side rendering, streaming, API routes, and server actions — all the building blocks you need to add AI features without bolting on a separate backend. DeepSeek slots in cleanly because its API follows the OpenAI format, which means the existing ecosystem of SDKs and tools already speaks its language.
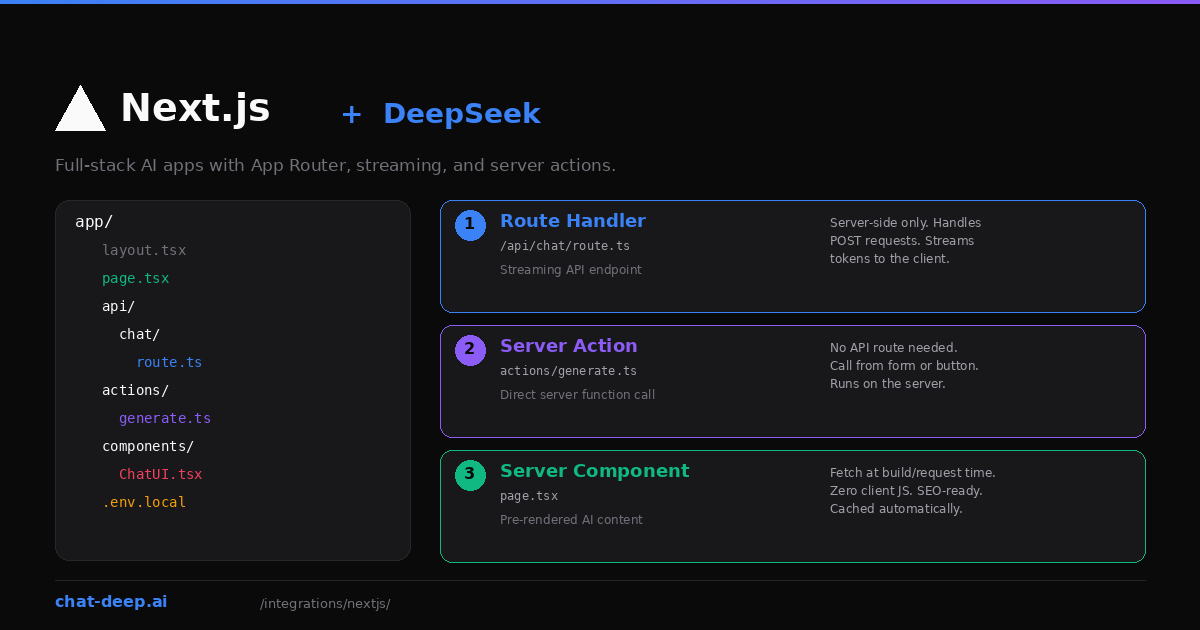
This guide focuses on where DeepSeek calls fit within a Next.js architecture. You will build three things: a streaming chat endpoint using a Route Handler, a one-shot generation using a Server Action, and an AI-powered page using a Server Component. Each pattern serves a different use case, and you will likely combine them in a real project.
We will use the Vercel AI SDK for the streaming examples because it handles the hard parts — SSE formatting, client-side hooks, and token streaming. For simpler calls, the OpenAI SDK works directly. If you need background on the DeepSeek API itself, start with our API documentation.
Project Setup
Start with a fresh Next.js project using the App Router:
npx create-next-app@latest deepseek-app --typescript --tailwind --app
cd deepseek-app
Install the DeepSeek provider and the AI SDK:
npm install ai @ai-sdk/deepseekCreate a .env.local file in the project root with your API key:
DEEPSEEK_API_KEY=your-api-key-hereNext.js loads .env.local automatically on the server side. The key is never exposed to the browser — a critical security requirement. Get your key from the DeepSeek platform. Our login guide covers account setup.
Pattern 1: Streaming Chat with a Route Handler
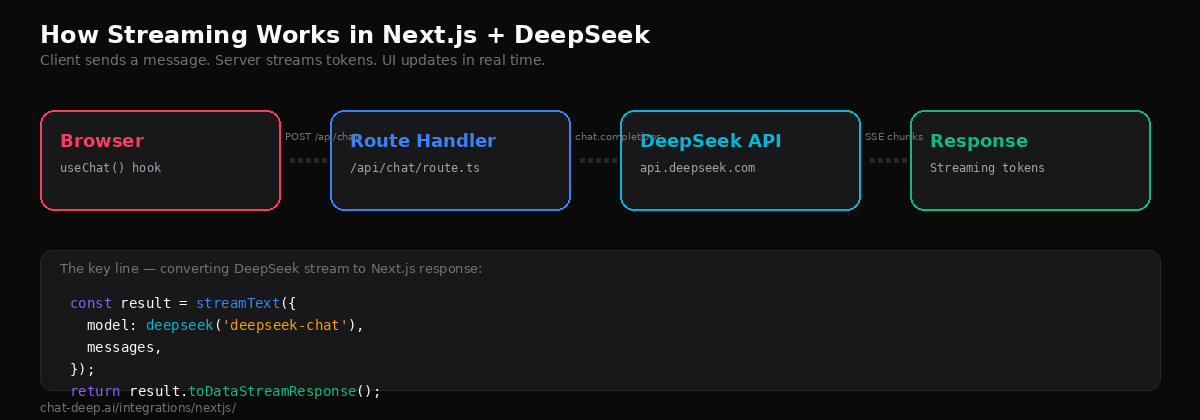
This is the most common pattern for AI features in Next.js. You create a Route Handler that streams DeepSeek’s response to the client, and a React component that renders tokens as they arrive.
Create the API route:
// app/api/chat/route.ts
import { streamText } from 'ai';
import { deepseek } from '@ai-sdk/deepseek';

export async function POST(req: Request) {
  const { messages } = await req.json();

  const result = streamText({
    model: deepseek('deepseek-chat'),
    system: 'You are a helpful assistant. Be concise.',
    messages,
  });

  return result.toDataStreamResponse();
}
This route accepts a POST request with a messages array, sends it to DeepSeek with streaming enabled, and returns a properly formatted server-sent events stream. The toDataStreamResponse() method handles all the SSE formatting that the client-side hook expects.
Now create the client component:
// app/components/ChatUI.tsx
'use client';

import { useChat } from '@ai-sdk/react';

export default function ChatUI() {
  const { messages, input, handleInputChange, handleSubmit, isLoading } = useChat();

  return (
    <div className="max-w-2xl mx-auto p-6">
      <div className="space-y-4 mb-6">
        {messages.map((m) => (
          <div key={m.id} className={m.role === 'user' ? 'text-right' : 'text-left'}>
            <span className="font-semibold">
              {m.role === 'user' ? 'You' : 'DeepSeek'}
            </span>
            <p className="mt-1">{m.content}</p>
          </div>
        ))}
      </div>

      <form onSubmit={handleSubmit} className="flex gap-2">
        <input
          value={input}
          onChange={handleInputChange}
          placeholder="Ask anything..."
          className="flex-1 border rounded px-3 py-2"
          disabled={isLoading}
        />
        <button
          type="submit"
          disabled={isLoading}
          className="bg-blue-600 text-white px-4 py-2 rounded"
        >
          {isLoading ? 'Thinking...' : 'Send'}
        </button>
      </form>
    </div>
  );
}
The useChat() hook from the Vercel AI SDK manages the entire chat lifecycle: it sends POST requests to /api/chat, parses the streaming response, maintains the message history, and exposes loading state. You do not need to set up WebSockets, manage AbortControllers, or parse SSE events manually.
Add the component to a page:
// app/page.tsx
import ChatUI from './components/ChatUI';

export default function Home() {
  return (
    <main className="min-h-screen py-12">
      <h1 className="text-3xl font-bold text-center mb-8">Chat with DeepSeek</h1>
      <ChatUI />
    </main>
  );
}
Run npm run dev and open localhost:3000. You have a working streaming chat interface backed by DeepSeek. That is the complete implementation — no external state library, no backend server, no WebSocket infrastructure. For building more complex web app features, see our web apps integration guide.
Pattern 2: One-Shot Generation with a Server Action
Server Actions let you call server-side functions directly from client components without creating an API route. This is ideal for single-generation tasks like summarizing text, extracting data, or generating a one-off response where streaming is unnecessary.
// app/actions/generate.ts
'use server';

import { generateText } from 'ai';
import { deepseek } from '@ai-sdk/deepseek';

export async function generateSummary(text: string) {
  const { text: summary } = await generateText({
    model: deepseek('deepseek-chat'),
    prompt: `Summarize the following text in 3 bullet points:\n\n${text}`,
  });

  return summary;
}
Call it from a client component:
// app/components/SummaryForm.tsx
'use client';

import { useState } from 'react';
import { generateSummary } from '../actions/generate';

export default function SummaryForm() {
  const [input, setInput] = useState('');
  const [summary, setSummary] = useState('');
  const [loading, setLoading] = useState(false);

  async function handleSubmit() {
    setLoading(true);
    const result = await generateSummary(input);
    setSummary(result);
    setLoading(false);
  }

  return (
    <div>
      <textarea
        value={input}
        onChange={(e) => setInput(e.target.value)}
        placeholder="Paste text to summarize..."
        className="w-full border rounded p-3 h-40"
      />
      <button onClick={handleSubmit} disabled={loading}>
        {loading ? 'Generating...' : 'Summarize'}
      </button>
      {summary && <div className="mt-4">{summary}</div>}
    </div>
  );
}
The 'use server' directive tells Next.js to keep this function on the server. The client never sees your API key or the DeepSeek endpoint. Server Actions are great for form submissions, button-triggered generations, and any interaction where you want a complete result rather than a stream.
Pattern 3: AI Content in Server Components
Server Components run on the server at request time (or build time with static generation). You can call DeepSeek directly inside them to pre-render AI-generated content — useful for SEO-critical pages or content that does not change per user.
// app/glossary/[term]/page.tsx
import { generateText } from 'ai';
import { deepseek } from '@ai-sdk/deepseek';

export default async function GlossaryPage({
  params,
}: {
  params: { term: string };
}) {
  const { text: definition } = await generateText({
    model: deepseek('deepseek-chat'),
    prompt: `Define "${params.term}" in 2-3 sentences for a developer audience.`,
  });

  return (
    <article className="max-w-2xl mx-auto py-12">
      <h1 className="text-3xl font-bold capitalize">{params.term}</h1>
      <p className="mt-4 text-lg">{definition}</p>
    </article>
  );
}
This page generates a definition for any term at request time, sending zero JavaScript to the browser. Search engines see the full rendered content. Combine this with Next.js caching to avoid regenerating the same content on every request — set revalidate in your route segment config to cache for a specific duration.
Be cautious with this pattern in production. DeepSeek API calls add latency to page loads, so caching or incremental static regeneration is essential. Also consider that LLM output can vary between calls, which may not be desirable for pages that need deterministic content.
Using the OpenAI SDK Directly
You do not have to use the Vercel AI SDK. The OpenAI SDK works in Next.js Route Handlers with manual streaming:
// app/api/chat/route.ts
import OpenAI from 'openai';

const client = new OpenAI({
  apiKey: process.env.DEEPSEEK_API_KEY,
  baseURL: 'https://api.deepseek.com',
});

export async function POST(req: Request) {
  const { messages } = await req.json();

  const stream = await client.chat.completions.create({
    model: 'deepseek-chat',
    messages,
    stream: true,
  });

  const encoder = new TextEncoder();
  const readable = new ReadableStream({
    async start(controller) {
      for await (const chunk of stream) {
        const text = chunk.choices[0]?.delta?.content || '';
        if (text) {
          controller.enqueue(encoder.encode(text));
        }
      }
      controller.close();
    },
  });

  return new Response(readable, {
    headers: { 'Content-Type': 'text/plain; charset=utf-8' },
  });
}
This gives you more control over the stream format but requires more code. You also lose the useChat() hook’s automatic message management on the client side. For most projects, the Vercel AI SDK approach is simpler and better maintained.
Environment Variables and Security
A critical rule when using DeepSeek in Next.js: never expose your API key to the browser. Next.js enforces this by default — environment variables without the NEXT_PUBLIC_ prefix are only available on the server. As long as your key is stored as DEEPSEEK_API_KEY (not NEXT_PUBLIC_DEEPSEEK_API_KEY), it stays safe.
All three patterns in this guide — Route Handlers, Server Actions, and Server Components — run on the server. The DeepSeek API call never executes in the user’s browser. This means your key is protected and your users cannot inspect network requests to steal it.
For production deployments on Vercel, add DEEPSEEK_API_KEY to your project’s environment variables through the dashboard. For other hosting platforms, set it in your container’s environment or secrets manager. For details on DeepSeek authentication, see our API guide.
Choosing the Right Pattern
Each integration pattern serves a different need. Here is when to use each one.
Route Handler + useChat() is right for interactive features where users expect real-time streaming: chatbots, writing assistants, code generators, Q&A interfaces. The streaming UX makes the app feel responsive even when DeepSeek takes several seconds to generate a full response.
Server Action is right for one-shot tasks triggered by a button or form: summarize this text, extract these fields, classify this input, translate this paragraph. There is no streaming, so the user waits for the complete result. Keep the response short to avoid long wait times.
Server Component is right for pre-rendered content that does not depend on user input at view time: glossary definitions, product descriptions, meta tag generation, documentation snippets. Cache aggressively to avoid calling DeepSeek on every page view.
In a real application, you will likely combine all three. A documentation site might use Server Components for static pages, a Server Action for a “simplify this section” button, and a Route Handler for an interactive chat widget in the corner.
Error Handling in Route Handlers
Production apps need to handle API failures gracefully. DeepSeek may return rate limit errors (429), server errors (500/503), or authentication failures (401). Here is how to catch and handle these in your Route Handler:
// app/api/chat/route.ts
import { streamText } from 'ai';
import { deepseek } from '@ai-sdk/deepseek';

export const maxDuration = 30;

export async function POST(req: Request) {
  try {
    const { messages } = await req.json();

    const result = streamText({
      model: deepseek('deepseek-chat'),
      messages,
    });

    return result.toDataStreamResponse();
  } catch (error: any) {
    console.error('DeepSeek API error:', error);

    const status = error?.statusCode || 500;
    const message =
      status === 429
        ? 'Too many requests. Please wait a moment.'
        : 'Something went wrong. Please try again.';

    return new Response(JSON.stringify({ error: message }), {
      status,
      headers: { 'Content-Type': 'application/json' },
    });
  }
}
On the client side, the useChat() hook exposes an error property you can use to display user-friendly error messages. Always log the full error details server-side for debugging while showing a sanitized message to the user. For a complete list of DeepSeek error codes and their meanings, see our API reference.
Deployment Tips
Set a maxDuration for streaming routes. Vercel’s default serverless function timeout is 10 seconds on the Hobby plan. Long DeepSeek generations can exceed this. Increase it in your route config:
// app/api/chat/route.ts
export const maxDuration = 30; // Allow up to 30 seconds
Use dynamic = 'force-dynamic' for routes that call DeepSeek with user-specific input. Without this, Next.js may attempt to statically generate the page at build time, which fails because there is no user input available during the build.
Consider using LiteLLM as a proxy if you need fallback providers, cost tracking, or rate limiting across multiple Next.js services. The proxy sits between your app and DeepSeek, adding operational features without changing your Route Handler code.
Monitor your token usage, especially with Server Components and Server Actions where calls can happen on every request. DeepSeek’s pricing is low — $0.28/M input tokens and $0.42/M output — but high-traffic pages can accumulate. Check our pricing page and use the status page to verify API availability before pushing to production.
Conclusion
Next.js gives you three server-side patterns for calling DeepSeek, each optimized for a different interaction model. Route Handlers stream tokens in real time. Server Actions generate complete responses from form submissions. Server Components pre-render AI content for SEO. All three keep your API key secure and your DeepSeek calls on the server where they belong.
Start with the streaming chat pattern — it covers the most common use case and takes about 15 minutes to build from scratch. Then layer in Server Actions and Server Components as your application needs them. The combination of Next.js’s server-first architecture and DeepSeek’s cost-effective API makes it practical to add AI features to any web app, whether it is a SaaS dashboard, a developer tool, or a content platform.
Explore the full range of DeepSeek integration options in our integrations section, including LangChain for RAG pipelines, LlamaIndex for document indexing, and the DeepSeek ecosystem overview for a broader picture of what you can build.