

You can use DeepSeek in VS Code by connecting an editor assistant to the DeepSeek API. For a first setup, Continue gives you a clear route from code questions to selected edits, with autocomplete configured separately. If you already work in Copilot Chat, a DeepSeek provider extension lets you keep that interface. Cline is another option when your main task is planning and carrying out changes across files.
Start with deepseek-flash, the API name for DeepSeek-V4.1-Flash. It supports text and images and costs less per token than deepseek-v4-pro. That makes it a sensible starting point, not a guarantee that it will produce the best patch for every project. The steps below connect directly to DeepSeek; a gateway or a local model has its own credentials, model names, and billing.
Table of Contents
Choose the VS Code workflow you need
Choose by the work you want the assistant to do. Chat explains code and answers questions. Edit proposes changes to selected code. Autocomplete supplies inline suggestions as you type. An agent can use tools to inspect files, edit them, and run commands. Connecting a chat model does not automatically configure all four.
| Your main need | Start here | What to know |
|---|---|---|
| Questions, selected edits, and a configurable completion model | Continue | A separate sidebar; chat and autocomplete have separate model roles. |
| Keep the Copilot Chat interface | DeepSeek V4 for Copilot Chat | A third-party provider extension with DeepSeek-specific thinking and image handling. |
| Plan and implement changes across a project | Cline | Start in Plan mode, then review the actions you allow in Act mode. |
| Configure a provider directly in current VS Code | Custom Endpoint | Built-in configuration for compatible APIs; advanced thinking/tool compatibility still matters. |
| Work without sending inference requests to a cloud model | Continue with a downloaded Ollama model | Requires suitable local hardware and a local model, not an Ollama cloud tag. |
You only need one route to get started. Installing several agents at once makes it harder to tell which extension owns a shortcut, completion, or error message. Set up one assistant and complete a small task before adding another.
Set up DeepSeek in VS Code with Continue
This route uses Continue’s DeepSeek provider and its current YAML configuration format. The API runs on DeepSeek’s servers, so you do not need to download model weights or install a GPU runtime.
1. Install Continue and create an API key
Install the extension through the Marketplace link in Continue’s installation guide, then open its sidebar in VS Code. Use an up-to-date VS Code installation and a small project whose contents you are allowed to send to an external service.
Sign in to the DeepSeek Platform API keys page and create a key for this setup. Check the account’s usable API balance as well. Access to the DeepSeek chat website is separate from API usage; logging in to the website does not connect your editor.
2. Keep the key separate from your model configuration
Create a personal .env file in your Continue directory: ~/.continue/.env on macOS or Linux, or %USERPROFILE%\.continue\.env on Windows. Add this line, replacing the placeholder with your key:
DEEPSEEK_API_KEY=your-deepseek-api-keyThis is still a plaintext secret file, not an encrypted vault. Keep it private and outside the project repository. Continue’s secret configuration lets the YAML refer to the key without embedding its value. Its IDE documentation says to use a .env file rather than assuming an export command in the integrated terminal will reach the extension. Restart VS Code after adding or changing the secret.
3. Add the DeepSeek model
Open the local Continue configuration at ~/.continue/config.yaml, or %USERPROFILE%\.continue\config.yaml on Windows. These are the paths in DeepSeek’s Continue integration example; use the current model name below instead of the older name in that example.
For a fresh configuration, use the complete file below. If you already have a configuration, add the model entry to its existing models list and keep your other models, rules, and tools.
name: DeepSeek in VS Code
version: 1.0.0
schema: v1

models:
  - name: DeepSeek Flash
    provider: deepseek
    model: deepseek-flash
    apiBase: https://api.deepseek.com
    apiKey: ${{ secrets.DEEPSEEK_API_KEY }}
    roles: [chat, edit, apply]
    capabilities: [tool_use, image_input]
    requestOptions:
      extraBodyProperties:
        thinking:
          type: disabled
The configuration reference defines the roles and capability flags. Here, chat, edit, and apply assign jobs to the model; tool_use and image_input declare capabilities the API actually supports. These flags do not add capabilities to a model that lacks them.
This starting configuration disables thinking to keep the first chat and edit simple and avoid relying on an older client’s handling of reasoning history. DeepSeek documents the thinking.type control in its thinking-mode guide. You can enable thinking later if your installed client preserves the required history in tool conversations; ordinary code explanations do not require that change.
4. Ask about selected code, then review one edit
Save the configuration, select DeepSeek Flash in Continue, and choose Chat mode. Highlight a short function and use Ctrl+L on Windows/Linux or Cmd+L on macOS to open a chat with that selection, following Continue’s quick start. Try an instruction such as:
Explain what this function returns for an empty input. Point to the relevant condition. Do not change the code.
You should receive an explanation tied to the selected function. A generic answer about the programming language is a reason to check whether the selection reached the chat. The request uses your API balance even though it does not edit a file.
Next, select the same function and use Continue’s Edit action, documented as Ctrl/Cmd+I. Ask for one change with a clear constraint, such as adding an empty-input guard without altering the function’s return type. Review the proposed diff, accept only the intended change, and run the relevant project check. If a shortcut opens a different extension, use Continue’s interface or check VS Code’s Keyboard Shortcuts list.
Configure autocomplete separately
Inline suggestions are a different workload from chat. Continue’s autocomplete documentation explains that fill-in-the-middle models use code before and after the cursor. A working chat connection therefore does not prove that Tab completion is configured or responsive enough for your typing.
DeepSeek documents FIM completion on the /beta base URL, with a 4K maximum output and non-thinking operation. To configure a separate DeepSeek completion entry, append the following item under the same models list:
  - name: DeepSeek Flash Autocomplete
    provider: deepseek
    model: deepseek-flash
    apiBase: https://api.deepseek.com/beta
    apiKey: ${{ secrets.DEEPSEEK_API_KEY }}
    roles: [autocomplete]
    defaultCompletionOptions:
      maxTokens: 256
    requestOptions:
      extraBodyProperties:
        thinking:
          type: disabled
The 256-token cap is a starting choice for short suggestions, not a provider requirement. Select this entry for autocomplete in Continue and enable Tab Autocomplete. In a small code file, write a descriptive function name or comment and pause where code should follow. An inline suggestion should appear; Tab accepts it. Check that VS Code’s editor.inlineSuggest.enabled setting is on, and temporarily disable another completion provider if the two compete.
If chat works but completions fail, investigate this model role, the beta endpoint, and the extension version before changing your API key. Continue also supports dedicated completion models; its autocomplete setup guide gives alternatives. You can retain DeepSeek for chat and edits while using a different completion model. This configuration follows the documented APIs; it is not a claim of measured completion latency.
Use DeepSeek inside Copilot Chat
If you already use Copilot Chat, DeepSeek V4 for Copilot Chat adds DeepSeek models to its picker. It is published by Vizards, not DeepSeek or Microsoft. DeepSeek’s integration guide links to the project, but that does not make the extension an official DeepSeek product.
The extension lists VS Code 1.116 or later and a Copilot plan, including Free, as prerequisites. Its publisher also warns that it relies on non-public Copilot Chat APIs that may break after updates. Follow those extension-specific requirements even though current VS Code’s general BYOK feature has broader access.
Install the extension, open the Command Palette with Ctrl+Shift+P or Cmd+Shift+P, and run DeepSeek: Set API Key. Then open Copilot Chat, select DeepSeek V4.1 Flash, and ask about one open file before permitting changes. The publisher says the key is held in VS Code SecretStorage rather than settings.json.
The current extension offers none, low, high, and max thinking options. Start with the setting appropriate to the question; more reasoning is not a substitute for giving the assistant the file and error it needs. Chat-model selection also should not be mistaken for changing Copilot’s inline completion model.
What about VS Code’s built-in Custom Endpoint?
Current VS Code documentation says BYOK chat can work without a GitHub sign-in or Copilot plan. Its Custom Endpoint provider replaces the older OpenAI Compatible setting. Open Chat: Manage Language Models, choose Add Models → Custom Endpoint, and enter a group name, endpoint name, and API key.
For Chat Completions, use model ID deepseek-flash and the full endpoint https://api.deepseek.com/chat/completions. Keep the secure key reference generated by the setup flow. In the generated model configuration, modelOptions can include {"thinking":{"type":"disabled"}} for an initial non-thinking connection.
This is a generic provider route, not proof that every DeepSeek-specific reasoning/tool exchange works in every VS Code version. For thinking-enabled agents, use an integration that preserves reasoning_content; see the troubleshooting section. Microsoft’s guide also distinguishes BYOK chat from features such as inline suggestions that still have separate account requirements.
Use Cline for project tasks
Cline is useful when you want an assistant to inspect a repository, work through a plan, and apply changes across files. Install its VS Code extension, open the Cline sidebar, and use its settings to bring your own provider key.
The native DeepSeek provider is the first place to look: choose DeepSeek, enter your key, and select the desired current model. If your installed version does not offer the model you need, update it. Cline also documents an OpenAI Compatible provider with these explicit fields:
API Provider: OpenAI Compatible
Base URL: https://api.deepseek.com
API Key: your DeepSeek API key
Model ID: deepseek-flash
The custom provider exposes model settings including output limits, context, prices, and Image Support. Enable Image Support for Flash if you need screenshots; do not enable it for the text-only Pro model. A generic compatibility setting still needs to handle DeepSeek’s conversation format, particularly when thinking and tools are combined.
Begin in Plan mode with a concrete task: identify why a named test fails, list the files involved, and propose a fix without changing them. Once the plan makes sense, switch to Act and approve the required work. Keep Auto Approve limited while you learn the workflow; a prompt asking for caution does not replace the tool’s permission settings.
For example, if a login test fails because an expired session remains valid, provide the test output and the session handler. Ask for the smallest change that addresses expiry, not a rewrite of the authentication system. After the patch, inspect both the implementation and the test: a passing test is not useful if the assistant weakened the assertion.
Kilo Code and terminal-based alternatives
You do not need to abandon a client you already know. Kilo’s provider guide directs VS Code users to Settings → Providers to add DeepSeek and enter a key. It still mentions older model names, so use the current DeepSeek catalog when selecting a model and check what your installed extension actually offers.
For Kilo’s terminal route, DeepSeek documents this installation and launch sequence, with Node.js installed:
npm install -g @kilocode/cli
kilo --version
cd /path/to/my-project
kilo
Inside Kilo, use /connect to choose DeepSeek and enter the key, then /models to select a model. Running this in VS Code’s integrated terminal gives you a terminal agent; it does not configure Tab completion or the Copilot Chat picker.
Deep Code is another terminal assistant. Its project quick start requires Node.js 22 or later:
npm install -g @vegamo/deepcode-cli
deepcode --version
If you choose this alternative, create or merge the following non-secret settings in ~/.deepcode/settings.json. Pro is used here because it is the model explicitly recommended in the project’s quick start; this is not a comparative performance verdict.
{
  "env": {
    "MODEL": "deepseek-v4-pro",
    "BASE_URL": "https://api.deepseek.com"
  },
  "thinkingEnabled": true,
  "reasoningEffort": "high",
  "permissions": {
    "defaultMode": "askAll"
  }
}
The project’s permission reference documents automatic approval as the default. The example chooses askAll; review any existing project permissions too, because explicit rules can take precedence. Set the key in the terminal session using the documented environment variable, then start in your project directory:
# macOS or Linux
export DEEPCODE_API_KEY="your-deepseek-api-key"

# Windows PowerShell
$env:DEEPCODE_API_KEY="your-deepseek-api-key"
cd /path/to/my-project
deepcodeUse the line for your shell, not both. Begin with a repository explanation. Only add more tools or broader permissions when the task calls for them; a terminal assistant is already capable of changing the project.
Choose a model and handle screenshots correctly
The official API quick start names deepseek-flash and deepseek-v4-pro. Flash currently serves V4.1-Flash; Pro serves V4-Pro-0813. The legacy names deepseek-v4-flash and deepseek-v4-flash-vision-exp still route to the current Flash model, but a new configuration should use deepseek-flash.
Keep Flash as the initial choice for explanations, edits, and agent tasks. Try Pro if Flash repeatedly misses something important on a well-specified text task, and compare the resulting patch, required corrections, and cost. The word “Pro” alone is not evidence of a better result. Our DeepSeek model guide explains the broader distinction between hosted names and downloadable models.
For a screenshot, chart, or UI bug, choose Flash. DeepSeek’s vision guide documents JPEG, PNG, GIF, and WebP input. A coding client must send that image content along with your question; attaching a picture in the interface does not, by itself, show which model received it.
In Continue, the model entry above declares image_input. In Cline’s custom provider, enable Image Support. With the Vizards Copilot extension, choose the V4.1 Flash entry for native image input. Its Pro entry uses a Vision Proxy: another model describes the picture and Pro receives that description. That extra step can miss visual details and may involve a different provider.
A useful first image task is a cropped, non-sensitive UI screenshot: ask which label overlaps which control and which relevant stylesheet to inspect. Check the description against the picture before authorizing a fix. Avoid concluding that the whole page layout is correct because the model found one visible defect.
Source files and uploaded images also follow different paths. An extension can read a text file and put its contents in the prompt. DeepSeek’s Files API, meanwhile, stores supported images for reuse through file_id; it is not a general PDF, DOCX, or repository-upload service. For custom image integrations, the vision API guide covers payloads and limits.
What does DeepSeek cost in VS Code?
Installing an extension and paying for model usage are separate decisions. A direct DeepSeek API key uses DeepSeek’s balance and token rates. A gateway, an extension subscription, or another model used as a vision proxy can have separate charges.
The following direct API rates are in USD per one million tokens, checked against DeepSeek’s pricing table on October 10, 2026. “Hit” means input reused from the provider’s context cache; “miss” means input billed at the uncached rate.
| Model and period | Input: cache hit | Input: cache miss | Output |
|---|---|---|---|
| Flash, off-peak | $0.003 | $0.15 | $0.60 |
| Flash, peak | $0.006 | $0.30 | $1.20 |
| Pro, off-peak | $0.022 | $0.66 | $1.98 |
| Pro, peak | $0.044 | $1.32 | $3.96 |
Peak periods are 01:00–04:00 and 06:00–10:00 UTC on weekdays, excluding Chinese public holidays. Other times, including weekends and those holidays, are off-peak. These are usage rates, not a monthly editor subscription.
For a hypothetical session using 100,000 uncached input tokens and 10,000 output tokens entirely off-peak, Flash costs $0.021: $0.015 input plus $0.006 output. The same token totals on Pro cost $0.0858. This is an arithmetic example, not a measured coding session or a prediction of how many tokens your task needs.
An agent may make many requests for one instruction, repeatedly including file contents and tool results. To control that, identify the relevant files, split unrelated work into separate tasks, stop a loop that repeats the same failed action, and inspect usage before a long run. A per-response output cap does not cap the cost of the entire agent session. See the DeepSeek pricing guide for a fuller cost breakdown.
Can you run DeepSeek locally in VS Code?
Yes, through an assistant connected to a local runtime. That is a different setup from using the hosted deepseek-flash API. A small downloaded R1 distill is not a local copy of the current Flash service, and selecting a cloud-tagged model in Ollama does not make its inference offline.
With Ollama installed and running, a small model can establish the local chat connection. For example, Ollama’s R1 1.5B package is a downloadable distilled model. It is a modest starting example, not a recommendation for demanding repository-wide work:
ollama pull deepseek-r1:1.5b
ollama list
Confirm that the exact tag appears, then add this entry to Continue’s existing models list, following its Ollama configuration guide:
  - name: Local DeepSeek R1
    provider: ollama
    model: deepseek-r1:1.5b
    apiBase: http://localhost:11434
    roles: [chat]
    defaultCompletionOptions:
      contextLength: 4096
Select Local DeepSeek R1 in Chat and ask about a small code selection. This example deliberately configures chat only; do not assume the same model is suitable for autocomplete, image input, or tool use. Memory requirements depend on the model, quantization, and context you configure. If you use WSL, SSH, or a dev container, remember that localhost refers to the environment where the client is running.
For private or offline work, check the whole setup, including fallback models and external tools. Ollama’s FAQ distinguishes local operation from cloud features. Our local versus API guide can help you decide whether the extra hardware and maintenance are worthwhile.
Use the assistant without losing control of the project
Give the assistant enough context to understand the task: the file, the observed failure, the intended behavior, and any constraint that must remain true. “Fix the app” invites a much broader change than “the login cookie is not cleared after logout; inspect these two files and propose a fix.”
Before an agent edits, save your current work or create a Git commit you can return to. Review its plan, inspect the resulting diff, and run the checks that matter for the change. If it gets stuck, provide the actual error and ask it to explain what the previous attempt failed to address. Repeating the same vague request can consume tokens without improving the result.
With a cloud API, selected code, prompt context, tool output, and images can leave your computer. Keep secrets and customer data out of the material you submit. A .gitignore rule helps prevent commits; it is not a universal restriction on what an agent can read. Use the extension’s access controls and your organization’s policy for private repositories.
Also check diagnostic settings before sharing a log. For example, the Vizards extension documents a verbose mode that can save full request dumps containing code and prompt content. Share a minimal error report with credentials and private content removed. If a key was exposed in a repository or message, revoke it and replace it; merely moving the file afterward does not undo the exposure.
Fix common setup problems
First identify where the failure occurs: loading the editor configuration, authenticating with the provider, receiving a model response, or carrying out a tool action. A working chat followed by a failed edit is a different problem from a request that never authenticates.
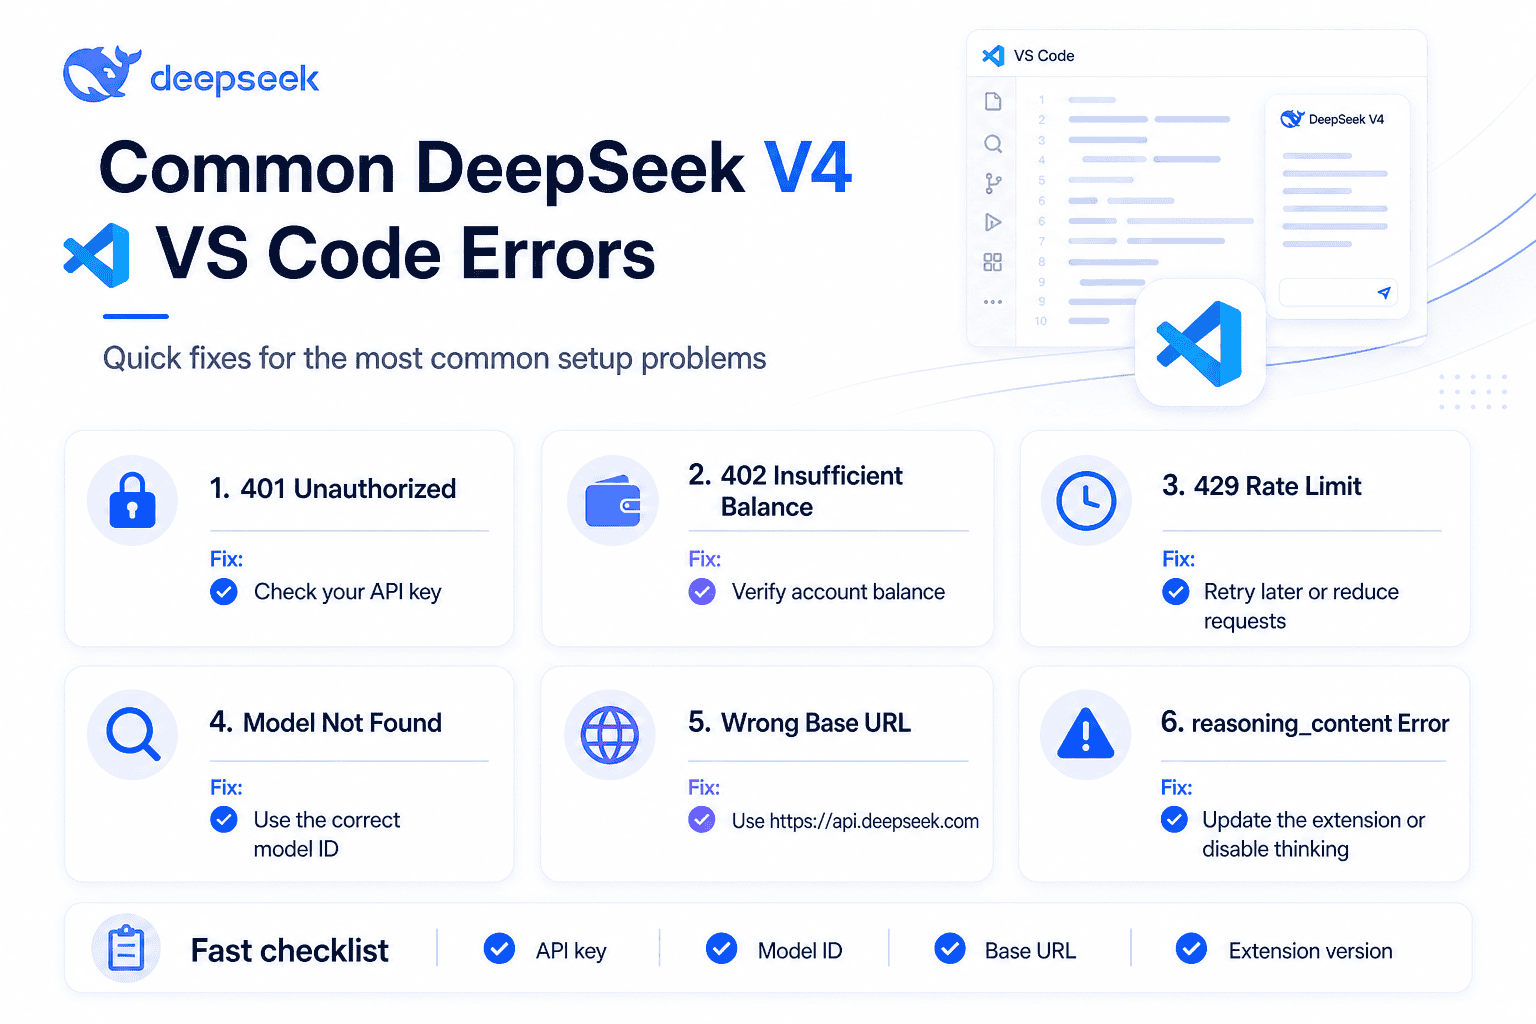
401, 402, 429, and server errors
DeepSeek’s error reference identifies 401 as an authentication failure and 402 as insufficient balance. Check that the key belongs to the provider you selected and that the account has usable balance. In Continue, also confirm the secret file location and restart after changing it.
For 429, reduce concurrent work and pace retries; do not let several agents hammer the same failing request. For 500 or 503, wait briefly before retrying. Preserve the exact error message because a 400 or 422 can point to a specific request-format or parameter problem, not an outage.
The model is missing or the URL returns 404
Check the provider, model ID, and endpoint together. deepseek-flash is the direct DeepSeek ID; a gateway may use another name. Use the base URL where a client asks for a base, and the full request URL where its configuration expects an endpoint. Do not paste a /chat/completions URL into every base-URL field or append the path twice.
If a new model does not appear, reload the configuration or update the client before switching to an obsolete alias. In current VS Code, check the model’s visibility in Manage Language Models. In Continue, check YAML indentation and whether you accidentally created a second top-level models key.
Chat works, but an agent returns a reasoning_content error
DeepSeek’s tool-call instructions require previous assistant reasoning to be returned when requests carry tools, even for earlier turns that did not call a tool. A client that drops that field can fail after its first response.
Update the integration and start a fresh conversation. If the error continues, use a provider implementation that supports that history or disable thinking through the client’s supported request settings. The initial Continue configuration above does the latter. Reducing temperature or repeatedly replacing a valid API key will not repair a missing conversation field.
An image attaches, but the answer ignores it
Check that Flash is selected and image input is enabled in that client. In the Copilot extension, the old Flash entry can use a proxy even though its API name now routes to the current model; select the V4.1 Flash entry for the documented native route. Try a supported image format and a question about a visible detail. For a failed PDF attachment, extract the relevant text or use a supported image rather than assuming the Files API accepts documents.
The assistant is slow or sees less context than expected
Inspect the selected model, thinking setting, and the amount of attached material. An extension can impose its own context limit below the API maximum. Raising that limit does not automatically improve an answer and can increase cost. Narrow the task to the relevant files first; for local models, a longer context also increases memory demand.
If only autocomplete is missing, revisit its separate model selection and inline-suggestion settings. If requests fail only on a company network, use the approved proxy or CA certificate configuration; Continue’s networking guidance covers those settings. Disabling certificate verification is not a routine fix.
Frequently asked questions
Is DeepSeek free in VS Code?
A free extension does not make direct API requests free. DeepSeek bills those requests by usage. A locally downloaded model avoids the hosted API’s token bill, but still uses your hardware and electricity. Any free access offered by an intermediary follows that service’s own terms.
Do I need a paid GitHub Copilot subscription?
Not for Continue or Cline with your own DeepSeek key. Current VS Code also documents BYOK chat without a Copilot plan. The separate Vizards provider extension lists a Copilot plan as a requirement and says its Free tier works; distinguish that extension from the built-in Custom Endpoint route.
Can I use my DeepSeek website login instead of an API key?
Not for the direct API configurations in this guide. Create a Platform API key and supply it through the client. Never put your account password into a field that asks for an API key.
Why does chat work while Tab autocomplete does not?
Chat and autocomplete have separate configuration and model roles. Check the completion entry, beta endpoint, and Tab Autocomplete setting, then look for competing inline suggestion providers. A successful chat response only confirms that the chat route works.
Is there one official DeepSeek VS Code extension?
The routes covered here use integrations from their respective publishers. DeepSeek’s documentation linking to an extension does not make DeepSeek its publisher. Check the actual Marketplace publisher and project documentation before entering a key.
Should I copy deepseek-chat or deepseek-reasoner from an older tutorial?
Use the names in the current API catalog instead. This guide configures deepseek-flash; Pro uses deepseek-v4-pro. Do not substitute those names into a local Ollama configuration, which needs the exact downloaded model tag.
Can DeepSeek read my entire repository automatically?
The client decides which files and tool results to provide. A large model context window does not mean every file has been sent or understood. Start with the files relevant to the task, check the assistant’s explanation, and expand the context when it identifies a specific missing dependency.
Start with one change you can judge
Get one connection working, ask about a function you understand, and review a small edit before handing over a larger task. Continue is a practical starting point for that sequence; Copilot Chat or Cline may fit better if you already rely on their workflow. Add autocomplete, images, or agent permissions when they solve a real need. The useful setup is the one that helps you make a change you can explain and verify.